Demeter Dress Hack: Back Ties

8.09.2019

For this hack you will need the Demeter Dress + Top sewing pattern, available in the shop.

It’s super easy to add ties to the Demeter Dress to give it a more defined waistline. Follow these instructions after completing step 19 (View A) or step 11 (View B).


Cut the back carrier loops and long tie lengthwise from your fabric. 
BACK CARRIER LOOPS (cut 2): 1” X 2”
TIE (cut 1): 1 ¼” X 56”


On both ends of the tie, turn under ¼” and press. Fold the tie lengthwise (wrong sides together) and press. Then fold either side under so the raw edges are enclosed, and press. Edgestitch along the full length of the tie. 


For the back loops, repeat the instructions as for the tie, except do not fold the ends under. Fold the carrier in half so it forms a loop. Repeat for the other loop.


To find a position for the back loops, find the center back of the bodice, then find the center between the side seam and the center back and mark the position. Do this on both the left and right side of the back bodice and place your loops here. I’ve found this is the best position for the back loops. You could alternatively add the loops at the side seams or a few inches to the back of the side seams. Stitch the loops in place a few times ⅜” away from bottom edge of bodice.


Continue with instructions for attaching the skirt. Thread tie through back loops and cinch waist in as much as you like. Enjoy!

A quick guide to bust adjustments

Most people will find they won't fit a pattern right out of the package and may need at least a few tweaks to get a custom fit. This is a simple guide to show you how to do two of the more common bust alterations. Although this is not an in-depth guide to bust adjustments, I hope this will be helpful for anyone who may need some guidance when performing these alterations. If you have never done a FBA (full bust adjustment) and you don't know if you need one, I recommend checking out some of the more in-depth resources listed at the end of this article.

There are other alterations you may need to do that will not be covered here. A book on fitting garments is great to have on hand and will make your clothing look so much more professional and tailored. Although there are many great fitting books, I recommend checking out The Palmer/Pletsch Complete Guide to Fitting.

Before you start these pattern alterations, place a piece of paper underneath your work so you can fill in the spaces after you have made the adjustments.

FULL BUST ADJUSTMENT
There are different methods of knowing whether or not you need a FBA. Many people recommend choosing your size based on your high bust rather than your full bust measurement and then doing a full bust adjustment on the pattern. This is where I would recommend starting out, but if you have very broad shoulders, this may not be the best way to achieve a good fit. In either case, you will want to sew a test muslin before cutting into your fashion fabric.
1. Draw a line from the bottom of the pattern to the
bust apex and then to the armhole.

2. Draw a second line from the side seam, at the
center of the bust dart, to the bust apex.

3. Draw a horizontal line from the center front to the
first line.
4. Cut through the first line until you reach the armhole,
leaving a hinge. Spread the pattern as much as you
need to add.
5. Cut the second line through the dart until you reach
the bust apex, leaving a hinge. Open the dart, swinging
the side seam back down so that it is parallel with the
first line that you cut.
6 . Cut the horizontal line all the way through and shift
this section down so that it is level with the edge of the
bodice.
7. Redraw the bust dart, hemline and center front.


LOWERING THE DART
Many people find they need to lower the dart on a pattern. It's a simple alteration and makes quite a difference on the finished garment. To find out if you will need to lower the dart, measure from your shoulder to your bust apex and then match this measurement to the pattern. If the dart point on the pattern is higher than your bust apex, lower the dart.

1. Place a piece of paper underneath the dart of the front
pattern piece. Draw a box around the dart and cut it
out.

2. Shift the dart up or down so that the point of the
dart is level with the most prominent point of your
bust. Secure the dart to the paper underneath and re-
draw the side seam.


FURTHER READING


Straight Leg Philippa Pants Tutorial (with free sailor jeans pockets pattern)

4.10.2019


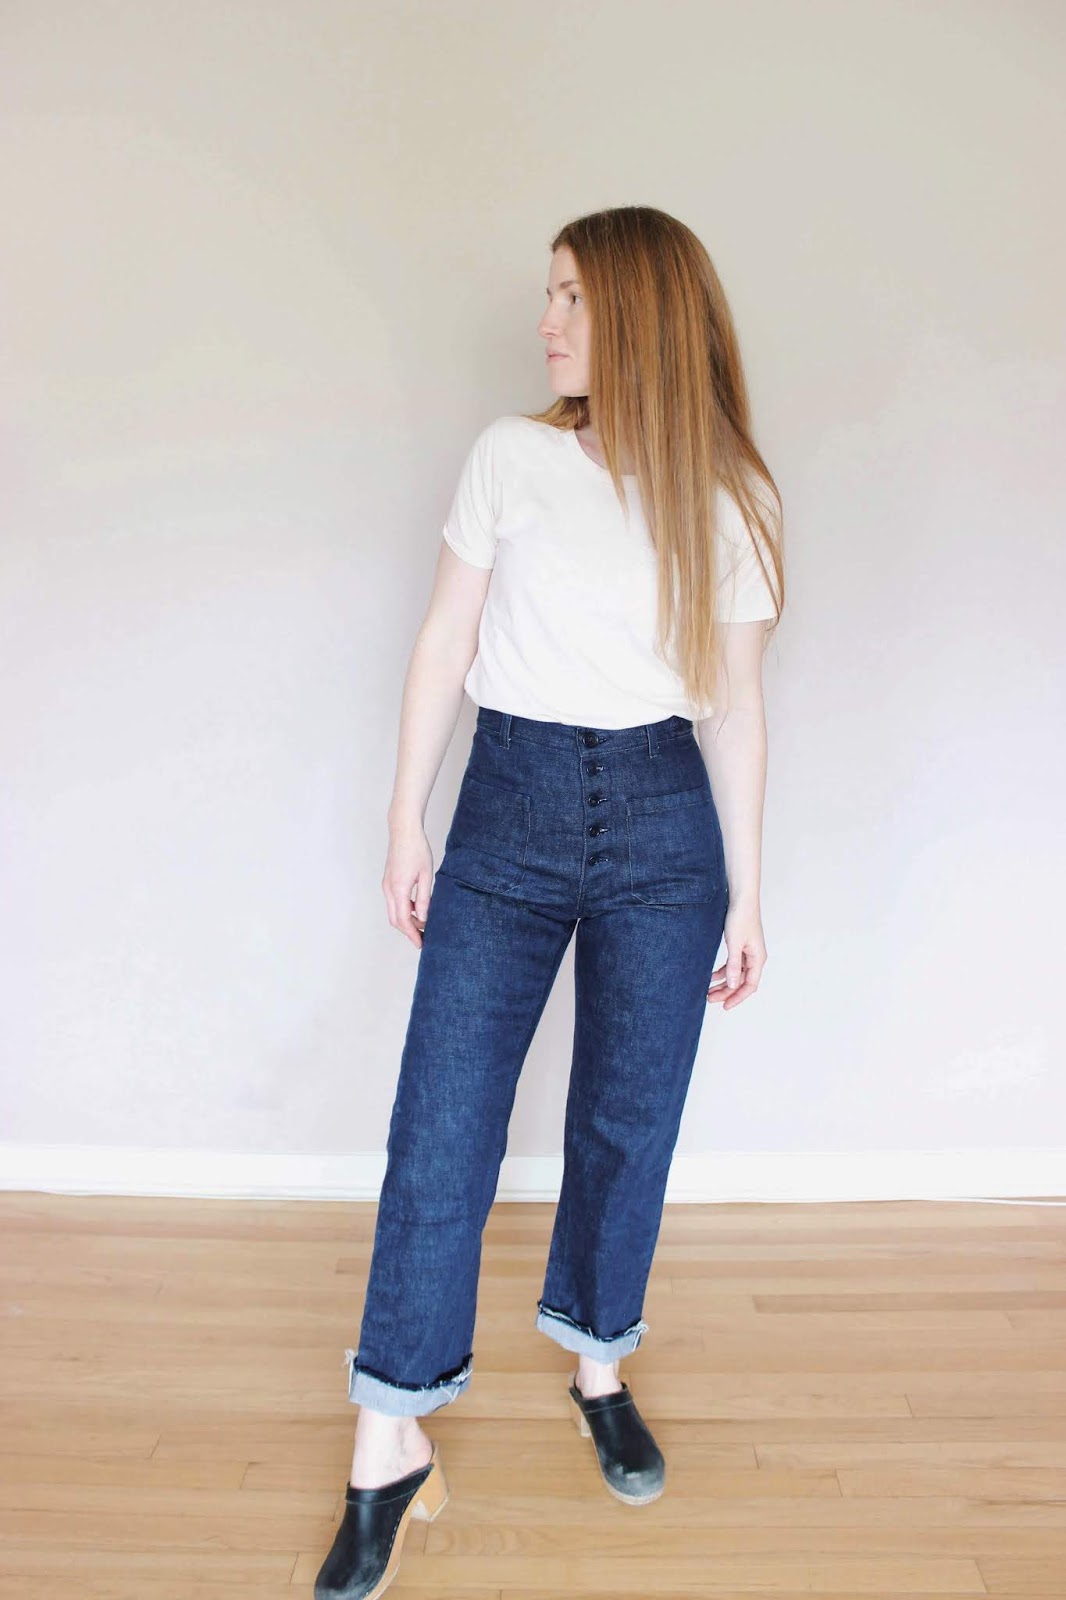
I wanted a pair of straight leg Philippa pants for summertime, so I made a simple alteration to the Philippa pants pattern for a looser fitting leg. Keep reading to find out how you can alter these tapered pants to create a straighter leg.

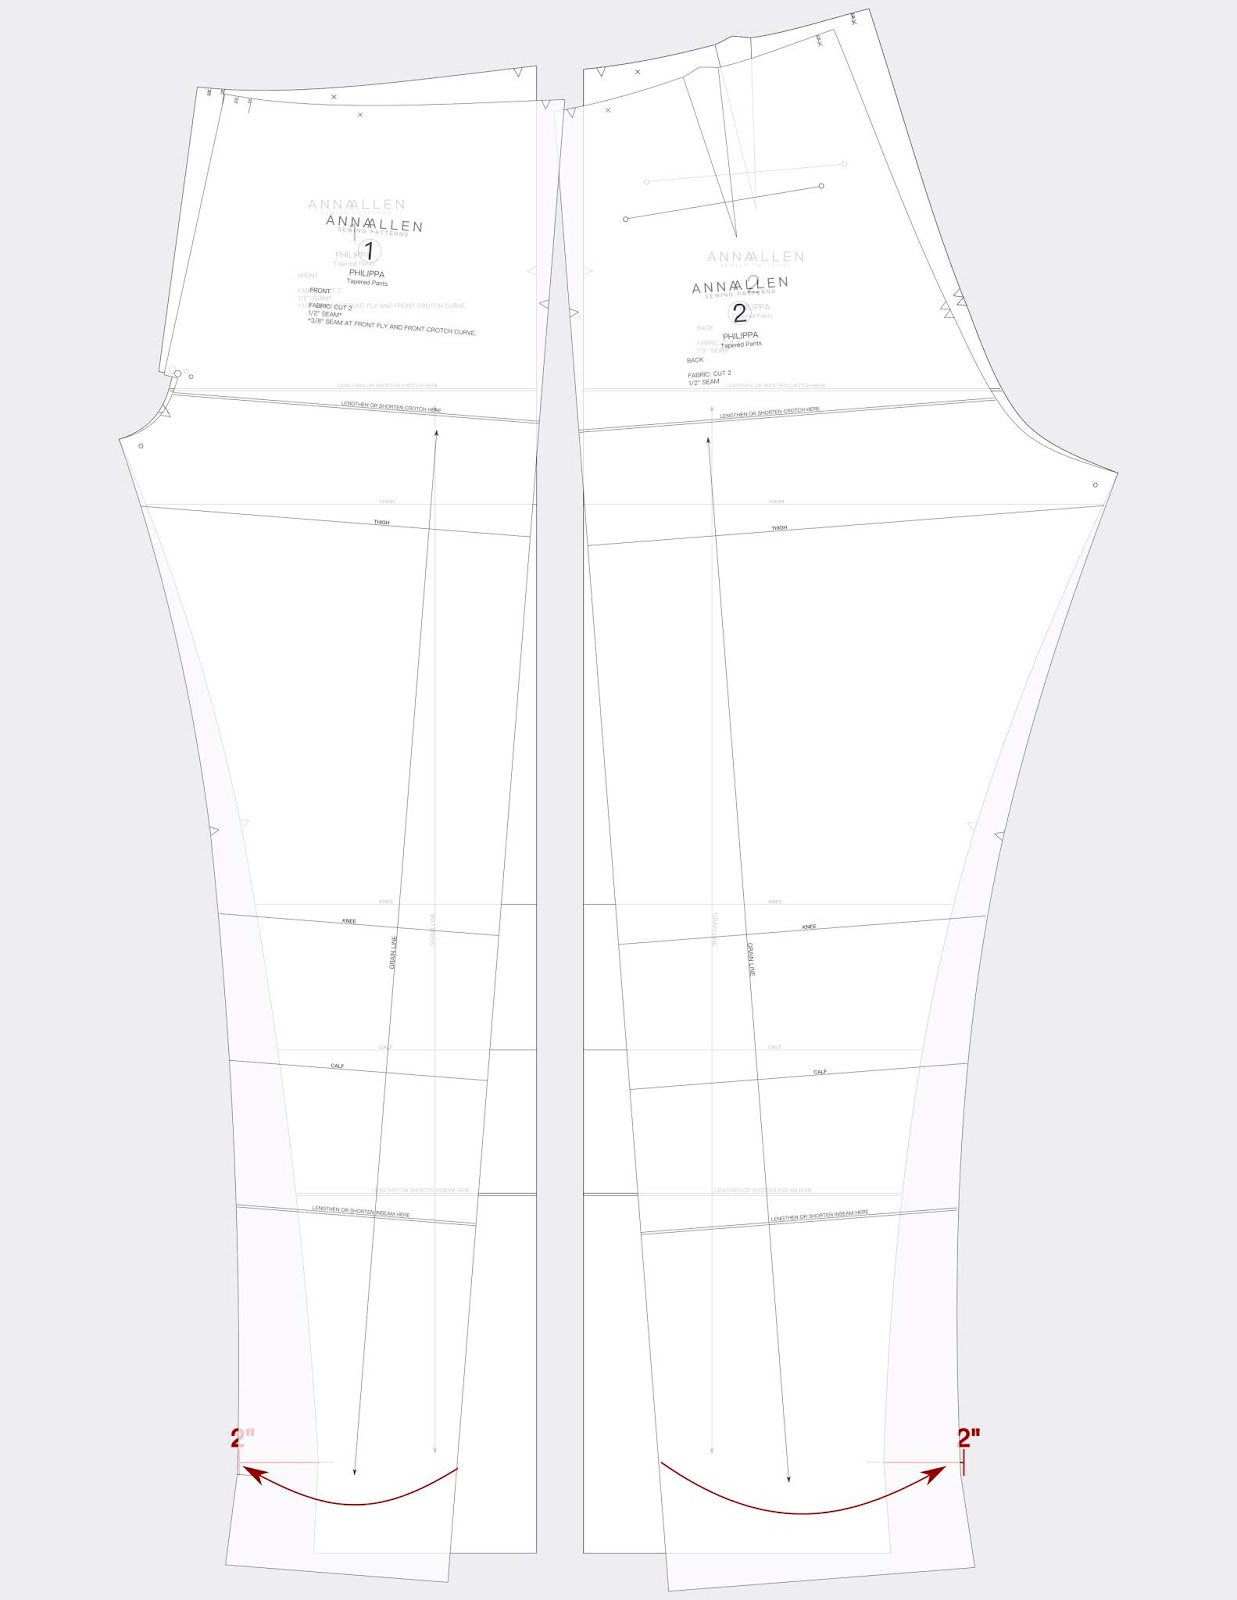
First determine how much wider you want your pants to be. I decided I wanted to add about 4” total on each leg, so I divided that number in half and added 2” to the inseam width at the hemline on both the front and back legs.

Measure 2" to the outside of the inseam hemline at both front and back pants and draw a line.


Next you need to draw a line starting from the 2" mark at the hem to the crotch. This isn't a straight line, but more of a curved line, tapered in at the crotch. To achieve this, you can pivot the pattern at the crotch point and swing the inseam out to match the hemline to the 2” mark. Trace the new inseam line. You may need to straighten the line up a bit more from knee to hem so it’s not as curved at the lower leg. But the pivot method helps give you just enough curve at the thigh without using a fancy ruler.

Pivot the pattern at the crotch point and swing the inseam out to match the hemline to the 2” mark. 


Trace the new inseam line. 

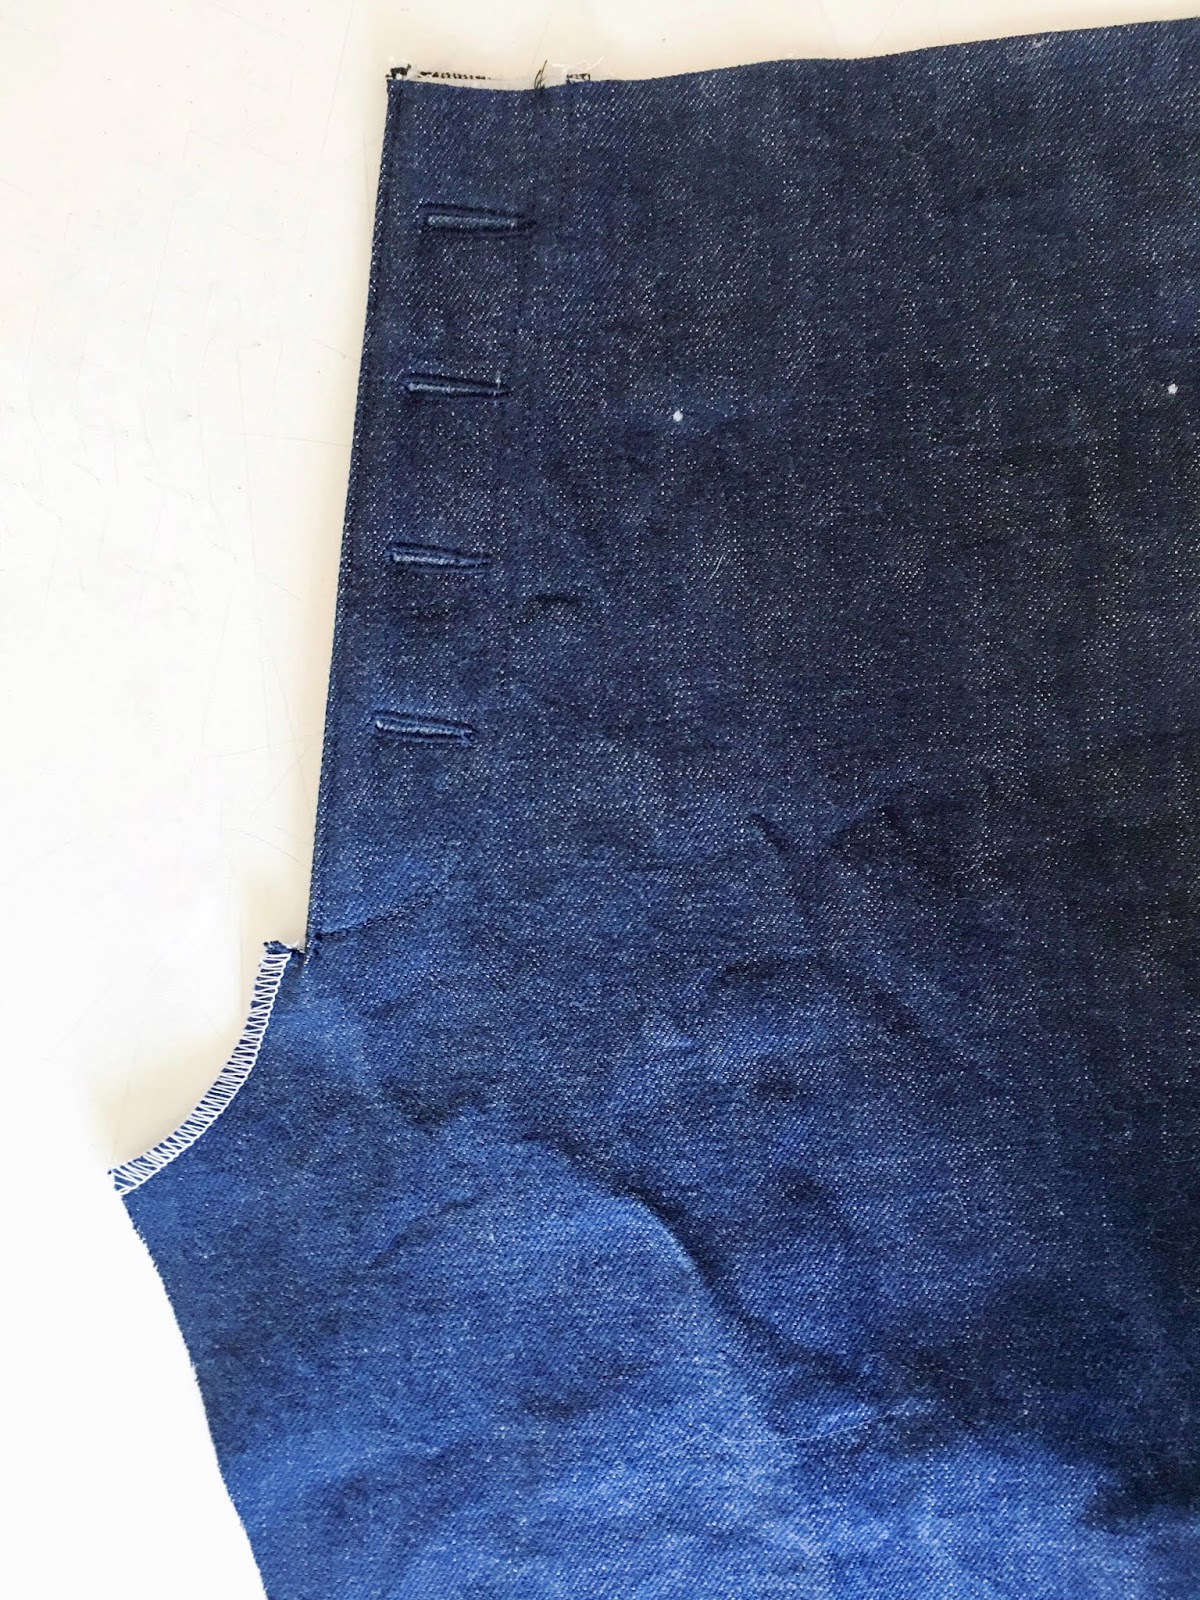
I also sewed the buttonholes directly onto the front pants fly, eliminating the button placket entirely. Instead of adding the fusible interfacing on the fly facing, I added a slightly heavier weight interfacing right onto the underside of the fly front. (So when you are cutting out the fly interfacing, cut it with glue side up.) I also found I needed to trim the outside edge of the interfacing about ⅛” so it didn’t show under the fly facing. The facing makes this area extra strong so the fly doesn't ripple as much when you button it. The heavier interfacing also helps if you are using a lighter weight fabric. You could interface both the fly facing and directly on the underside of the pants fly, as I have just described if you are using a lighter weight fabric. I did not interface both pieces for my pair because I used a pretty stiff denim.

Interfacing applied directly to the underside of the pants front.

Buttonholes sewn directly onto the left pants front after attaching the fly facing.


For fun I added front and back patch pockets for a vintage sailor jeans look. I created a free pdf pattern for the patch pockets if you would like to recreate this style (which you could also use for the Persephone pants).

Click on the photo above to download the free Sailor Jeans Pocket PDF pattern.


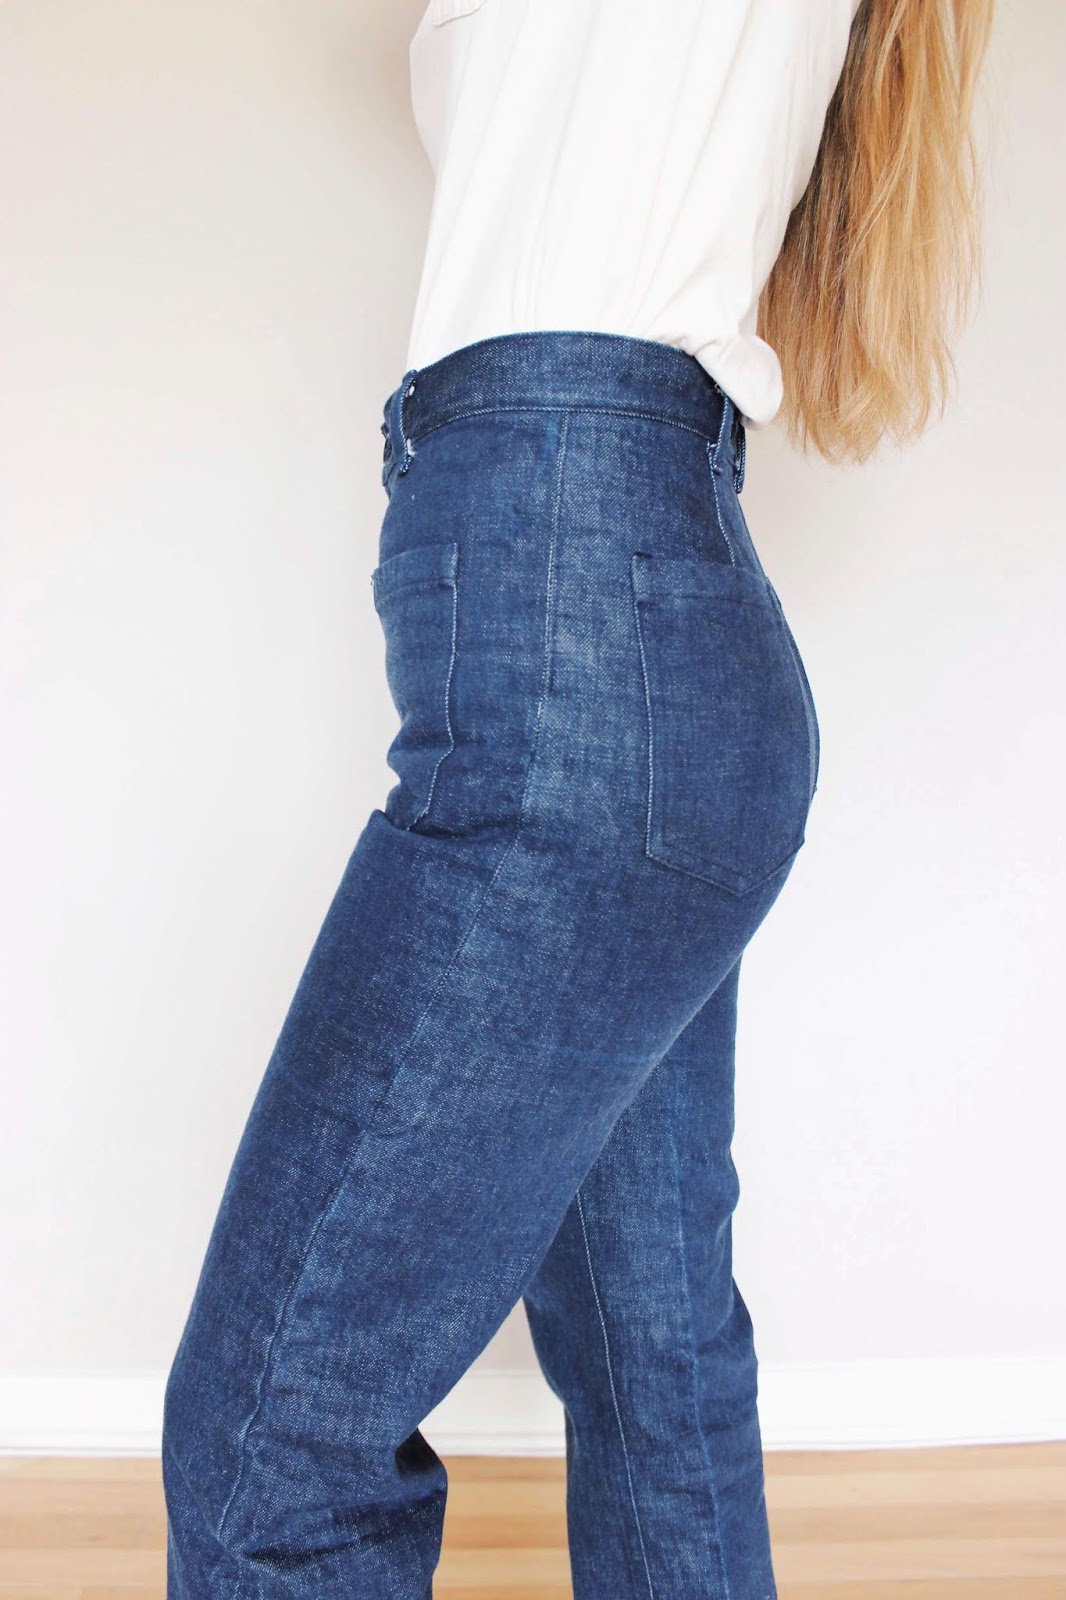
The front and back pockets are parallel with each other (lining up at the top edge). On my size 4 pair, both front and back pockets are located approximately 3 1/4” down from the top edge. The front pockets are 2 1/4" from center front edge and the back pockets are about 1 1/2" from center back. Keep in mind the location of the pockets will vary from person to person. You can use the back pocket placement on the Philippa pants pattern to help you determine where the back pockets should go and then line up the front pockets with the back pockets so they are parallel with each other. I made my back pockets less angled and more straight by shifting the center back edge of the pocket placement up about ½”.

Pivot the inner (cb) pocket placement edge up approximately 1/2" to straighten the back pockets.

I recommend waiting to sew the pockets until the end, so you can try on your pants and figure out exactly where you want your pockets to go. I had to rip out the front pockets and re-sew them because they were way too far apart and looked all wrong! Learn from my mistakes!


Belt carriers/loops: I sewed them slightly wider, about 1/8" wider and about 1/2" shorter (3" long). Instead of sewing the loops into the waistband seam, I folded the edges under and sewed them directly onto the pants with bar-tacks on the top and bottom. The three loops in the back are placed on the back darts and center back seam.


The fabric I used is a 13oz Japanese 100% cotton selvedge denim I purchased last year at Fashion Fabrics Club. 

The buttons are corozo buttons in the color navy purchased from Benno's Buttons in sizes 13/16" for the large button and 5/8" for the fly buttons.

For this pair I decided not to use any fancy thread, but instead I just used matching navy thread and I really love this look! I'm still trying to figure out what to do with the hem. I cut the pants with a 1" hem, but originally I just wanted a raw frayed hem at cropped length. I can't decide if I should hem them or keep them raw! I think I'll wear them cuffed with the raw hem like this for a while longer before I decide. 


I hope this little tutorial inspires you to create different variations of pants and jeans using a basic pattern. It's easy to change just a few little details for a fresh new look! If you make this variation to the Philippa pants, I would love to see them! For photos posted to social media, feel free to tag me @annaallenclothing and/or use these hashtags in your post: #philippastraightleg and #philippapants


Lotte Blouse Hack

3.30.2019


Spring is here and all I want to wear are pretty floral romantic blouses! I hacked the Lotte Blouse pattern, giving it fuller sleeves and body, adding length to the top edge so that it sits on top of the shoulders and I also shortened the sleeves. I sewed a narrow self-fabric tie for the neckline, mostly for decoration, but I think it adds a nice touch. Keep reading if you are interested in recreating this blouse!

Materials:

  • Lotte Blouse PDF sewing pattern
  • About 2 1/2 yards of 45" wide fabric (I used Lecien cotton lawn "Memoire a Paris" from a few years ago)
  • A few yards of cord or yarn to make the self fabric tie
  • Elastic, thread etc (as specified in the sewing instructions)


Cut out your size and alter the pattern as follows:


Add 3" to the top edge of all pattern pieces (front, back and sleeve)


Extend the center back and center front 2".


Extend the sleeve width at the fold line by 4".


For short sleeves, as pictured here, shorten the bottom edge by 3 1/2".


Continue with the sewing instructions included with the pattern. When you have folded the top edge under, preparing it for the elastic casing, add a piece of fusible interfacing at center front. This is where you will sew a small buttonhole, about 3/8" long, for the self fabric tie to go through.


Continue with the instructions, sewing the top edge casing, sleeve casing and hem. Thread the elastic through the neckline. Instead of letting the elastic fall off the shoulder, pull the elastic tighter so the blouse sits on top of your shoulders, or wherever feels most comfortable. Thread elastic through the sleeve cuffs, trying on to make sure the cuffs are loose enough around your arms.

Make a self fabric tie: Cut 1" wide bias strips of fabric and sew together so the final length measures approximately 60" long.


Take a long piece of cord or yarn and knot the end. Wrap the bias strip right sides together, around the cord, keeping the knotted edge slightly above the bias tape and stitch along the top edge several times so the cord is secured to the bias tape. You do not want the cord to pull through the stitching when you go to turn it! 


Using your zipper foot, stitch less than 1/4" away from edge, encasing the cord, and pulling the bias tape as you sew.


When you finish sewing the length of tape, trim the top corner and begin pulling the cord so as to turn the bias tape right side out. It may take a little time to get the top edge to turn, so you may need to use a sewing pin to help it along. Keep working at turning the tape, being gentle at any areas where there are seams.


Once you have completely turned the cord, cut off the end. Secure a small safety pin to one end of the fabric tie and thread through the buttonhole, continuing around the neckline and then out of the same buttonhole on the other side. Tie into a bow and trim edges. You may want to turn the edge of the self fabric tie to the inside and hand stitch closed, but I left mine raw. 


That's it! Try the blouse on and re-position the neckline gathers to where it looks most flattering on you. I like the gathers primarily in the front and back, and less on the shoulders/sleeves. I personally find this style looks best tucked into high waisted pants, like the Persephone pants/shorts or Philippa pants. If you make this blouse, feel free to tag photos on Instagram with #lotteblousehack so I can see yours!